Tampilkan postingan dengan label Product Review. Tampilkan semua postingan

Sabtu, 05 Februari 2011

Product Re-Review: Maybelline Falsies Mascara

I did a post at the end of December about the award-winning Falsies Mascara by Maybelline! (See the lash-tastic post HERE!) I gave the mascara a big sparkly A+ back then, and said I would do a re-review of it if my opinion changed because I had only used it for about a week... So I am here to do a re-review.. Sort of!
Here is a picture from the first review! I still think this mascara does great things!!

My overall opinion of the mascara hasn't really changed much! But now I've used it almost everyday since back in December so I have come to really get a feel for this mascara! Here is what I think now::

~The mascara is wonderfully dark, if you get a few coats! The mascara tends to flake a little bit more than my other fave. CoverGirl Lash Blast Luxe but applying the coats wrong makes this bad!! (I will explain how I apply the coats in just a minute!) Another thing I have noticed is that it isn't quite as dark as when I first started using it! This may be that I have gotten used to it so the effect has worn off a little or it may be that it has dried out and now I have to use more coats to get that same black black lashes look!

I mentioned the coats and here is how I find is best-- in easy to follow steps!
***The key is to do ONE EYE AT A TIME!***
1. Curl ONE eye's lashes!
2. Apply first coat of mascara to top lashes
3. Apply the amount you want to your bottom lashes-- be quick!
4. Apply second, third, fourth, however-many-you-want coats to the top lashes!
--If you want, you can touch up the bottom lashes between putting coats on the top lashes
5. Do the other eye!

I've found that this mascara isn't very forgiving on the coats... If you apply mascara to your lashes that already have dried mascara on them, it will flake a lot! This mascara gets to that point veryyy quick! So doing one eye at a time is the best solution I have found!

Overall, I would take the rating from a big big big A+ to a solid A! It is still my favorite mascara of the moment and the one I use pretty much everyday!

Big lashes and bigger love,
Samantha <3

Jumat, 04 Februari 2011

Product Review: Crown Brush Kandee-Deal Brushes

I have been waiting to do this review for such a long time! As soon as I saw this deal, I knew I was going to do a review on it! And the time has finally come!  I will apologize now for a long post!

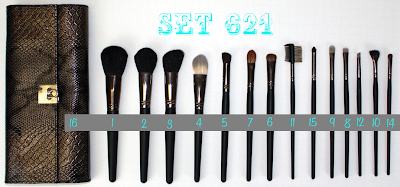
These are the 2 kits I got:
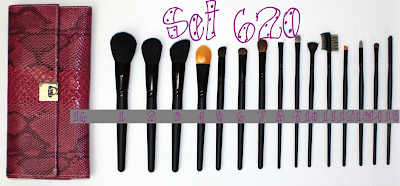
Click on me to see me bigger!
Click on me to see me larger! *Oval Lip not pictured! **Brushes in different order than set 620!

They both come with the same type of brushes, but have different colored bristles for some of them! Here are the brushes numbered for on the pictures!

Sets Include:
1. Chisel Powder • 2. Chisel Blush • 3. Angle Blush • 4. Foundation
5. Angle Blender • 6. Oval Shadow • 7. Blending Fluff • 8. Flat Liner
9. Concealer • 10. Lash Fan • 11. Brow/Lash Groomer • 12. Angle Liner 
13. Oval Lip • 14. Mini Smudger • 15. Round Crease • 16. Faux Reptile Case


These babies retail for $43.99 but Crown Brush paired up with my sweet friend Kandee Johnson to give us this amazing deal... I paid $29.99 (each!!) including shipping! Yaa baby! That is about $2 a brush! Plus a case!

What a steal!

So what do I think? (This is after using the one Glenn bought me for Christmas, feeling another pink set and then feeling the bronze set I bought for my kit!)
Overall:: Great brushes!

Here is the deets on them!
~~Out of the 2 pink sets I have used/felt, the face brushes in one were incredibly softer than the other set (if you ordered a set and the face brushes aren't soft, try getting in contact with Crown--they are still swamped but they have great customer service!)
~~Brushes are Sable hair unless noted otherwise down below!

My favorite brushes out of the set:
3. Angle Blush: This brush is great! It is a great shape for blush! (hehe hence the name!)
5. Angle Blender: Ohhh man! I had gotten one of these for my kit a few months ago and was soo bummed I didn't have one for myself! But now I do! I loveeeee this brush! Its like they took a normal round blending brush and cut it t the angle of the angle liner! It is perfecttt for putting shadow right above the crease! Like in pin-up looks!
7. Blending Fluff: This is great for laying down the first color or any color you are going to wash all over your lid!
12. Angle Liner: I have plenty of angle liner brushes I could use but I really like the size of this one! It's especially great for doing the innermost part of your liner!
15. Round Crease: This thing is great for smudging out colors for a great smokey look!

Other brushes I adore: (all of them but some in particular!)
6. Oval Shadow: Great for applying colors you want to concentrate in one spot and things like pigments because it is so packed full of bristles!
1. Chisel Powder: This thing covers your whole face super quickly!

So what in the world is each brush for?? Well here is what I use them for!
1. Chisel powder: I use this to apply my setting powder after my foundation! Thee bristles are long and very moveable so it glides around your face!
2. Chisel Blush: I use this to apply a light coating of bronzer all over my face (I'm uber white so I gotta get some color back into my face!) and highlighter. Bristles are shorter than the chisel powder brush and a little more compact
3. Angle Blush: I apply my blush with this everyday! Bristles are angled, as if you took the chisel blush and cut the top at an angle but bristles are looser more like the chisel powder!
4. Foundation: I actually haven't used this brush because I use a sponge or my fingers but I'm going to donate it to my kit and use it for misc. things like applying primer and spreading foundation! Bristles here are synthetic for cremes!
5. Angle Blender: I use this to apply eye shadow right about my crease! (Keeping the shadow above your crease will open up your eyes!) These bristles are cut at an angle to fit nicely above your crease, in between the length of the oval shadow and the blending fluff!
6. Oval Shadow: I like to use this one to apply colors I want to keep concentrated in one area! Like if I add a little touch of gold or something that I just want in one spot! The bristles are short and compact (kinda like a kabuki of eye shadow brushes!)!
7. Blending Fluff: I use this to apply the color that I put all over my lid, and then I use the tip to apply the highlight under my brow and sometimes in the inner corner! I occasionally use it to blend if the colors are stubborn and wont blend with the other brushes!
8. Flat liner: I haven't used this one just yet because I love the angle liner! (hehe) Bristles are synthetic for cremes and gels, short and stiff for lining!
9. Concealer: Show me a girl with no blemishes, and I'll show you her secret- this brush! Great for applying concealer to blemishes and under eyes! Bristles are synthetic for your cremes and liquids!
10. Lash Fan: I've used this for applying light touches of highlighter to my cheeks! Bristles are short and stiff! (This is probably my least favorite brush so I don't use it often!)
11. Brow/Lash Groomer: Brows- I use this to get the foundation out of my eye brows before I fill them in with shadow! The bristles are short and stiff so it works great to really get it out of there! Lash Groomer- this is used to separate your lashes! Bristles are plastic! haha
12. Angle Liner: Self explanatory! I use this for my eye liner! But only the cremes, gels, or pencil transfer because the bristles on this baby are synthetic! Meaning you need a different brush to set in that liner with a powder!
13. Oval Lip: I actually really love to use this for concealer on small blemishes! It's smallness makes it great for precise application! Bristles are synthetic!
14. Mini Smudger: I use this to apply extra details like a little flash of purple coming out of my eye liner! But it would work to use it to set your creme/gel/pencil eye liner! Bristles are short and the tip is rounded like the side of a circle!
15. Round Crease: I use this to smudge out smokey eye colors! It is great for blending like that! Bristles are short and dome tipped with a point! These are also called pencil brushes sometimes!
16. Faux Reptile Case: Who doesn't love a faux reptile case?!

This was not my first purchase from Crown Brush and it definitely won't be my last! I have several of their brushes and they are great! (I'll do a little post on the other things I have from them soon!)

Overall I would give these brushes an A! (It's not an A+ simply because there seemed to be some variation to how soft the brushes are between sets!)

Brushes and lost blog posts,
Samantha <3

Rabu, 02 Februari 2011

Product Review: NYX Soft Matte Lip Creme

If you don't shop at Ulta much, there is reason to start now! They have expanded their NYX collection!! The one by me expanded like 3 times the size it was before!  This means, more products to review and talk about! Here is the first one::

NYX Soft Matte Lip Creme
I have it in Istanbul (pictured right up there!)
Here is a swatch of it!
It turns out a little more pink on your lips but if you pair it over a berry colored lip liner, it tones it more to a dark shade of this!

The little tubey says:
It's not lipstick,
nor is it gloss.
It's like nothing
you've
experienced
before. It's
lipstick cream
that goes on
silky but looks
soft matte.

Now what do I think about this little tube of soft matte lip stick creamyness??

Let's start with the positives::
**I love the opaque-ness of the color! I have pretty naturally red lips (I know a lot of people like that but I want the opposite of course! ha ha), but this color really did work to cover that and show the color it says it would. That is pretty impressive to me!
**I love that it is really pretty easy to put on, it functions much more like a gloss in that sense!

Now the negatives::
**It goes on easy but leave some streaky-ness as you rub your lips together, so a mirror is definitely wanted when using this! This, for me, took out the easy-ness of it!
**As it dries to be long wearing, your lips start to feel very dry... but if you apply lipgloss or chapstick, it goes back to the streaky-ness of the first problem!
**This stuff never comes off! It wears off of the main parts of your lips but it gets into the cracks of your lips (which everyone has, no matter how moisturized your lips are! So you really can't avoid this!)... you have to really work to get it out of there!
**My final negative, and the reason I don't like this product very much, is that it makes your lips very prone to getting that white filmy-ness that comes when you leave lip products on for too long without reapplying or applying something on top of it! This is a personal thing for me... I HATE that stuff! It grosses me out; I know everyone gets it but I just don't like it at all!

Overall, would I buy it again?
Unfortunately, I won't be buying this again, or any of the other colors it comes in! But I will be buying more NYX products for sure! I am actually going to return this and get a different NYX product to review! And I have a few things already to review form them so look out for those coming soon!

Smackeroos,
Samantha <3


Senin, 31 Januari 2011

Product Review: Sally Hansen Continuous Treatment Base & Top Coat

One final product review to finish off January! I realized I hadn't done one until this morning so I decided to do another one to get my 31st post in the month!

I did a post right about the end of december about not using a base coat when I painted my nails, and what I thought about it! (See the nail goodness HERE!)

But this review is of a top coat that I have been using for a few months now! (Glenn bought it for me so I could do a review and I never did one! So here it is! And it's a quick one too!)

Sally Hansen Continuous Treatment Base & Top Coat

All top coats (unless it's stated otherwise) make your nails shiny.. but let's get down to the real question::
Does it work?!
Overall, I think it has been a great top coat! It makes my nails shiny, and has really helped protect them from breaking! My nail polish still chips after a 5 or so days (it really depends on what my hands are up to during those days!) but I have yet to hear of a top coat that prevents that (except for good old fakeroo nails! which I desperately want again!).. if you know of a great top coat, please give me the info in a comment! I love to try out new nail polishes! I even like this polish over cheap-o nail polishes like NYC polishes! I really think it does a great job making those last longer than other top coats!

I would give this polish -as a top coat- an A-! It works better than most I have tried recently! I even like it better than OPI's top coat! But this isn't a cheap top coat, it costs $9.39 at Ulta! And about that same amount at Target!

If your fingers do the talking, let your nails tell the world you are pretty,
Samantha <3

Product Review: Aveeno Moisturizer

Yay! Another product review! I have been searching for a while for a good moisturizer that has spf that wont break the bank, or irritate my face!  The result of that searching is::
Aveeno Positively Radiant Daily Moisturizer SPF 15

I've been using it for just over a month so I think I have a really great feel for it!
And here is what I think about it:

Overall I really like this product so far! It goes on very smooth and evenly-- but it isn't too thick for daytime and doesn't leave any weird films on your skin or anything like that, so that is a great improvement from the last moisturizer I tried! It also works great under makeup (its not too thick for your makeup to stick to!) and it works great to mix into foundation to make a tinted moisturizer!

Something I really like about this is the smell! The fragrance is super light so some people may not even notice it but I really enjoy the smell so I notice it every morning! It's really great!

Now the bottle says its "clinically proven to even out tone & texture"! I can't say that I have noticed any huge improvement in my skin, but I can say that it hasn't caused ANY breakouts! At all! I have used this on my face and neck (your neck is very important to moisturize because it can show your age alot!) for about a month and haven't had any more breakouts (one or two here and there but nothing that I would blame on this moisturizer!).

I use just about one pump (a little less than that rather than more!) to do my whole face and most of my neck! That means the bottle should last for a while! I got it at Target for just $14.99 (this is less than Ulta unless you use a coupon!)

Overall I would give this moisturizer an A! (not an A+ because I haven't noticed it doing what the bottle says it does!)

Moisturize and realize you're beautiful,
Samantha <3